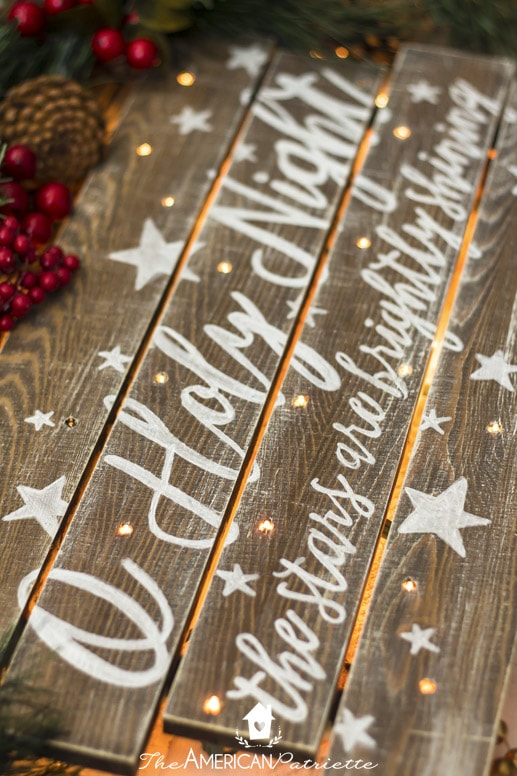
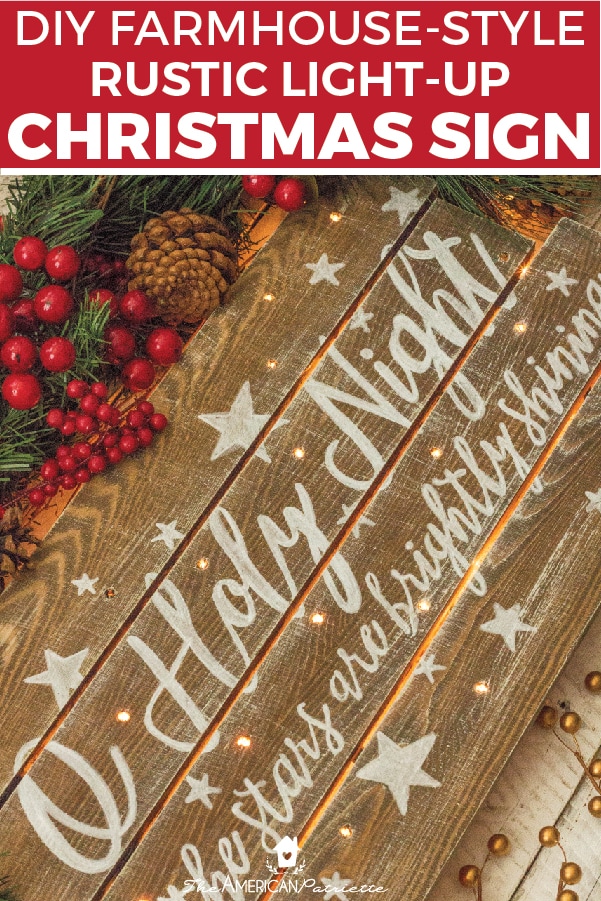
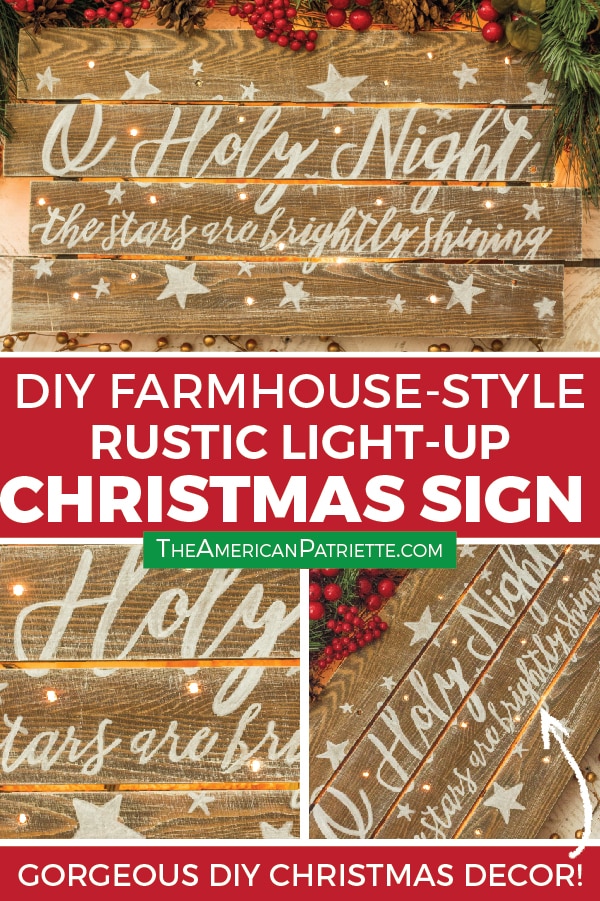
DIY Rustic Light-Up Christmas Sign
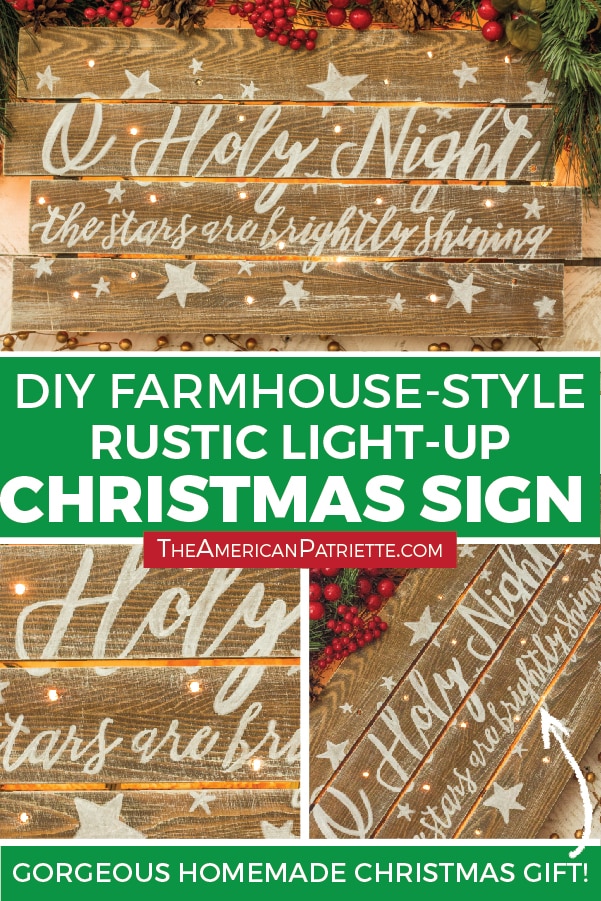
This DIY Rustic Christmas Sign, complete with a cozy glow of Christmas lights and a verse from “O Holy Night,” is an inexpensive homemade Christmas craft and makes for a gorgeous piece of holiday home decor. If you’re looking to dress up a space with some rustic farmhouse charm this Christmas, or if you’re looking for a great idea for a homemade Christmas gift, this project is perfect for you!

This DIY rustic light-up Christmas sign is sure to bring a beautiful radiance to any room you put it in! I originally made this with a pre-lit, unfinished wood sign from Hobby Lobby, but because Hobby Lobby no longer carries that sign, I re-created this tutorial to show you how to make your own version of a light-up sign. I’m so excited to share this updated tutorial with you – this has been such a beloved homemade Christmas craft for so many people.
Though I was bummed when Hobby Lobby stopped carrying that pre-lit sign, I realized this version of the sign is much better for a few reasons:
- You can easily change the lights if they burn out
- The glow from the Christmas lights is much cozier than the pre-lit sign
- You can more easily customize it with more (or fewer) lights depending on where you’re displaying it in your house.
So, if you came over looking for a tutorial that looks more like this…

…the new version is very similar, super simple to make, and will likely last you longer than the original version. Let’s get started crafting!
Video: Walk-through of How to make this DIY Rustic Christmas Sign
Tip: STILL go through all of the steps + photos below the video, simply because you’ll find references to the exact materials I use, but, here’s a tutorial video where I walk you through how to make the sign and you can see just how easy it is to make it!
Detailed Tutorial for How to Make this DIY Rustic Christmas Sign
Step 1: Collect all of your materials
This post contains affiliate links for your convenience. You can go here to read my full disclosure policy.
Here’s what you need:
- A wooden pallet sign from Hobby Lobby (or you can create your own if you prefer – the sign I used from HL was about $7 on sale)
- Lettering printed out on 2 8.5″ x 11″ papers (you can get the exact document I made & used for the lettering on this sign at the bottom of this post)
- Scotch Tape to tape the papers with the lettering on them together
- Pen
- Strand of Christmas lights (I used a 35-pack) – I personally used ones you have to plug in because the battery-powered ones don’t have a warm glow like I’d prefer
- Battery-powered drill (if you don’t already have one and you’re a crafter, this has been one of the most-used tools we have! This is the drill we have and are super happy with it.)
- Drill bit & drill bit guage (the width of your Christmas light bulbs – see tutorial for more details)
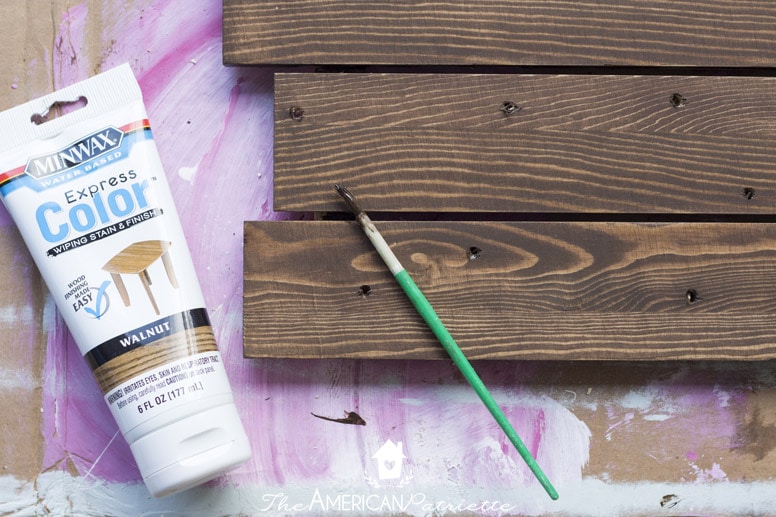
- Wood stain (that is what I used and would definitely recommend – I use it for almost every DIY project I do because it works so well for crafting. See my notes in the tutorial about why I love it so much, but overall, it’s the best because: it’s water-based, it dries very quickly so you can do this project faster, it’s very easy to clean, and it has extremely low odor, so you can easily do this project inside without stinking up the place. I can’t find it in home improvement or craft stores anymore, so I now purchase mine on Amazon.)
- Old rag or sock & small craft paintbrush to apply stain
- White or cream-colored acrylic paint (if you want to do a dry brush effect)
- Old paintbrush (to do the dry brush effect)
- Piece of white chalk
- Painter’s tape (optional – see tutorial)
- Chalk pen to paint on the lettering (this is the only chalk pen I ever use now – it’s just the best! Just like the stain, I’m very loyal to this particular product – I’ve tried so many others and this has consistently worked the best.)
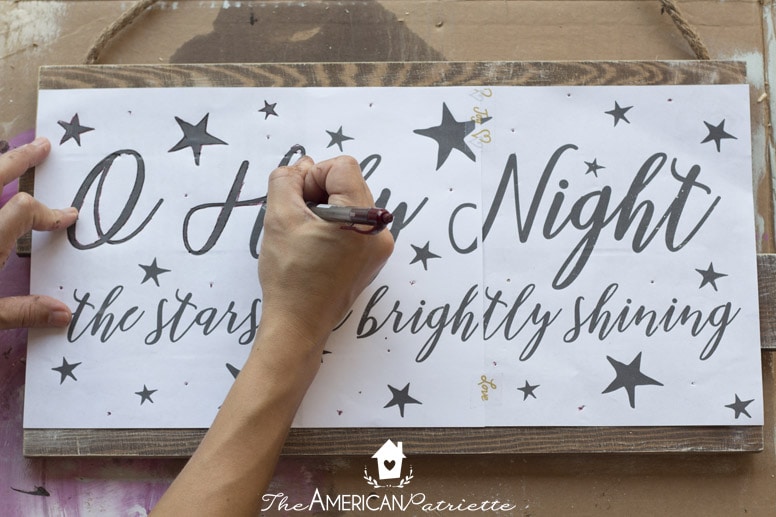
Step 2: Print sign & tape together, place on wooden sign
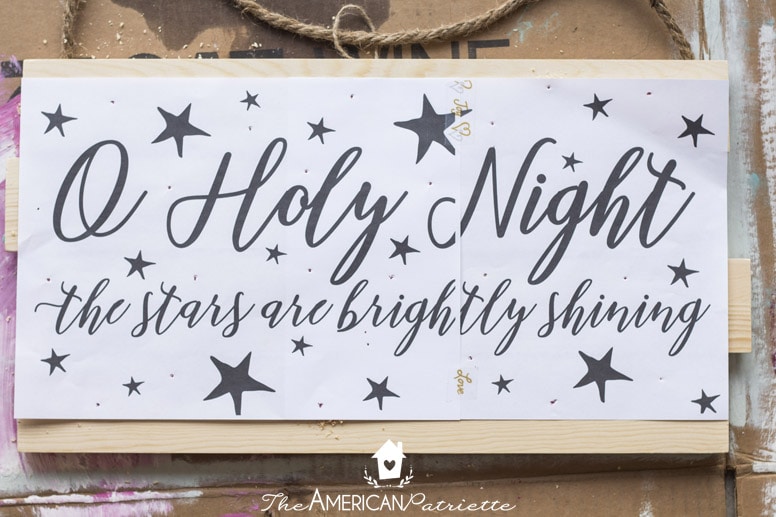
Print out the two pieces of paper using the free printable download I’ve created for you to use for the sign (you can snag it at the bottom of the post). Tape together using Scotch tape – only tape on the front! Place the paper on the wooden sign where you want it placed. I made sure that the bottom line of text fit almost perfectly on one slat, just so the break in the slats wouldn’t break up the text. You can see from the photo above with that one slat peeking out on the right side – that second line of text is almost completely on that slat.
Tips for this step:
- Make sure the paper is centered on the sign, and make sure it’s parallel with the sign (not tilted at all)
- Mark the four corners of the sign on the wood so that when you remove it, you have it marked where it needs to be placed again
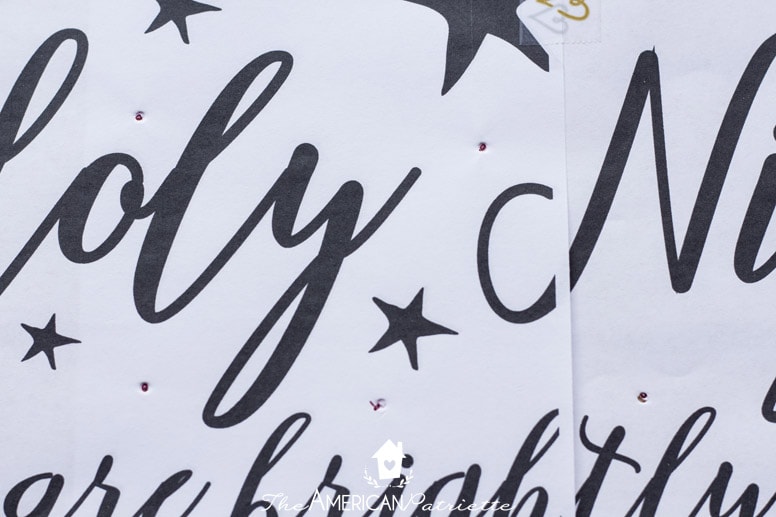
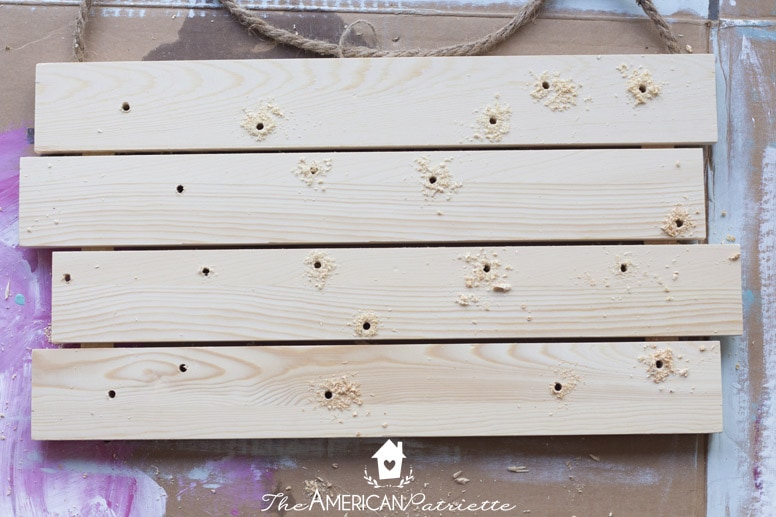
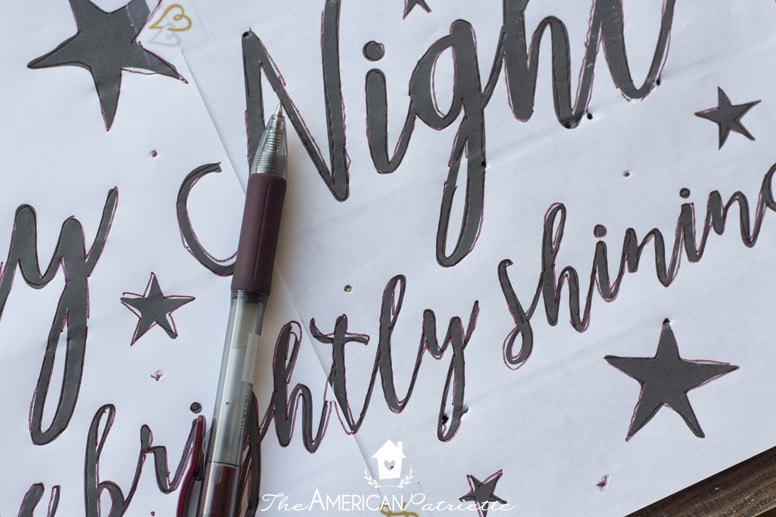
Step 3: Mark dots on sign & wood for the lights
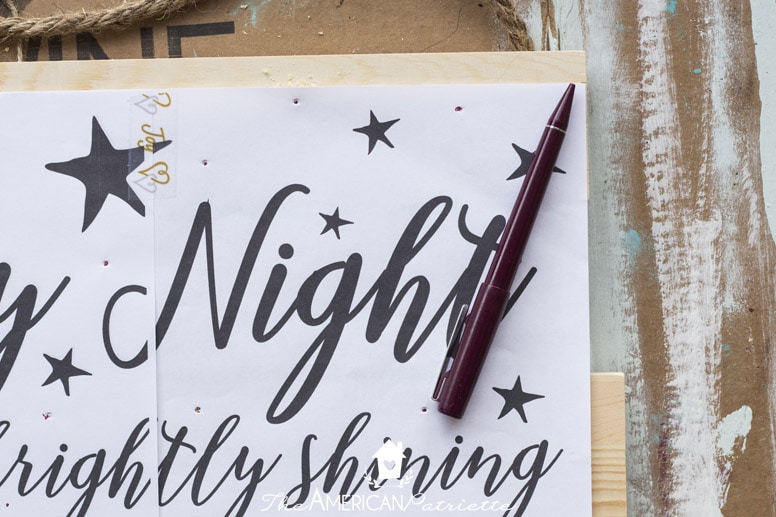
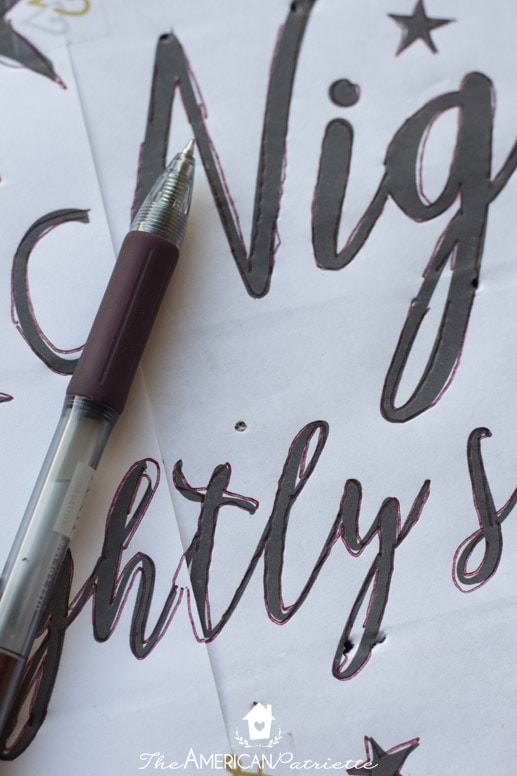
Use a pen to mark dots on the sign (and press hard enough that there’s an indentation on the wood below) to for the placement of your Christmas light bulbs. I used a strand of 35 lights and did about 20 dots. In the picture below, you can see how I pressed hard to create the impressions on the paper and thus onto the wood.
Tips for this step:
- Once you’ve made your impressions on the paper/in the wood, remove the paper and use the pen to quickly color in the dots in the wood. This will help you go quickly when you’re drilling the holes in the wood.
- Make fewer holes than you have Christmas light bulbs. I started out using a strand of 20 lights and so I made 20 holes, but I realized later that you need more wiggle room with the lights. They don’t always stretch perfectly from one hole to the next. So, a strand of 35 seemed to be perfect for this project.
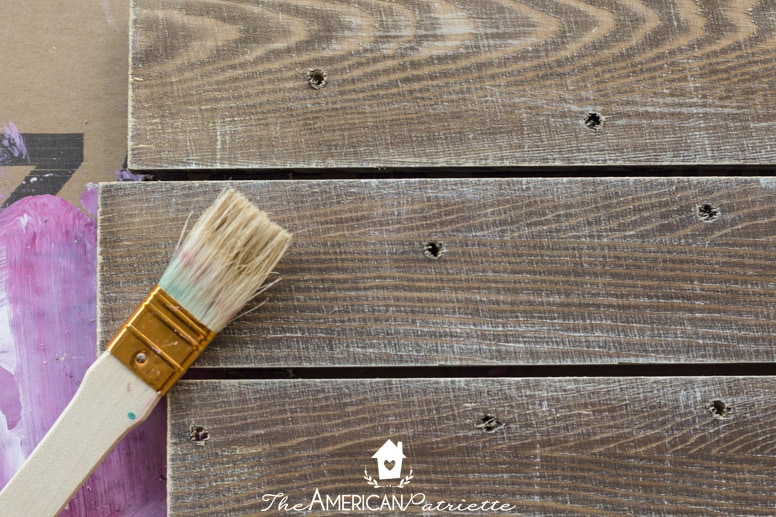
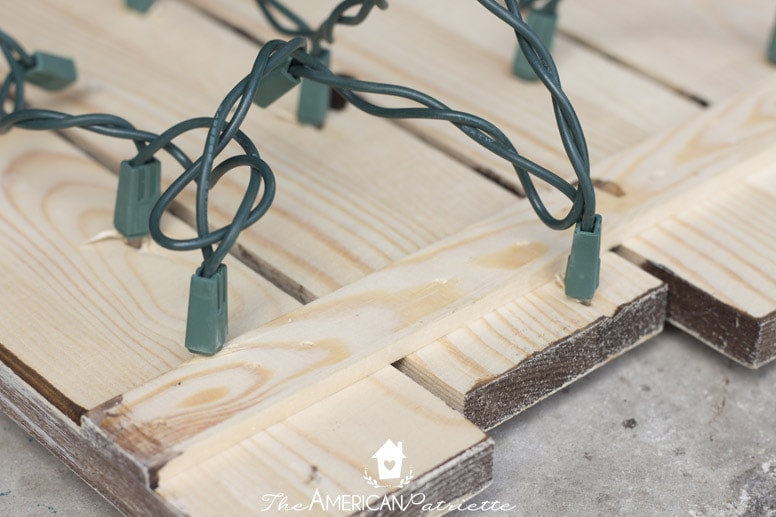
Step 4: Measure the Christmas light bulb & drill holes in sign
If you’re using a standard set of Christmas lights like I did, you can probably just use the exact same size drill bit that I used (13/64), but if you’re using other Christmas lights or perhaps battery-powered ones that are a different size, then you’ll need to take the correct measurement for your lights. You can see how easy this is using a drill bit gauge:
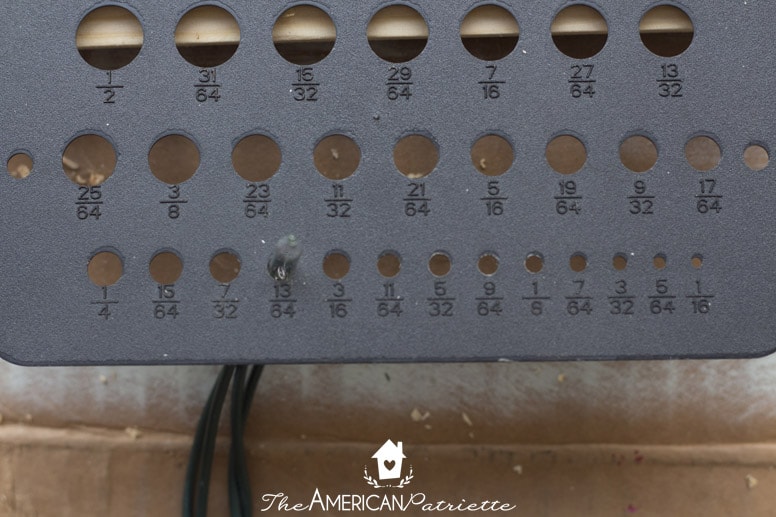
You want to have a good fit – a little snug – so that way the Christmas light bulbs fit snugly into the hole. Again, if you’re using standard lights, you can use the same measurement I used. Insert your drill bit into your battery-powered drill and start drilling holes where you’ve marked those dots on the sign. We did this in our garage – the floor is cement, and we had a cardboard box beneath the sign. That was plenty of buffer as we drilled holes straight through the wood.
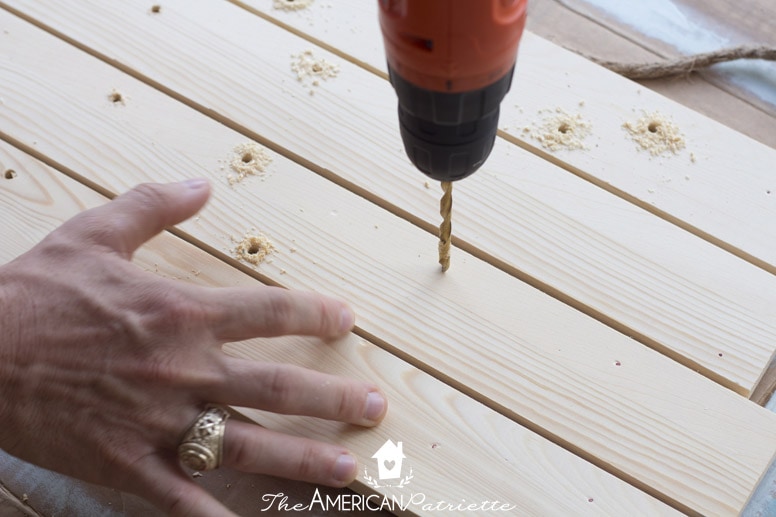
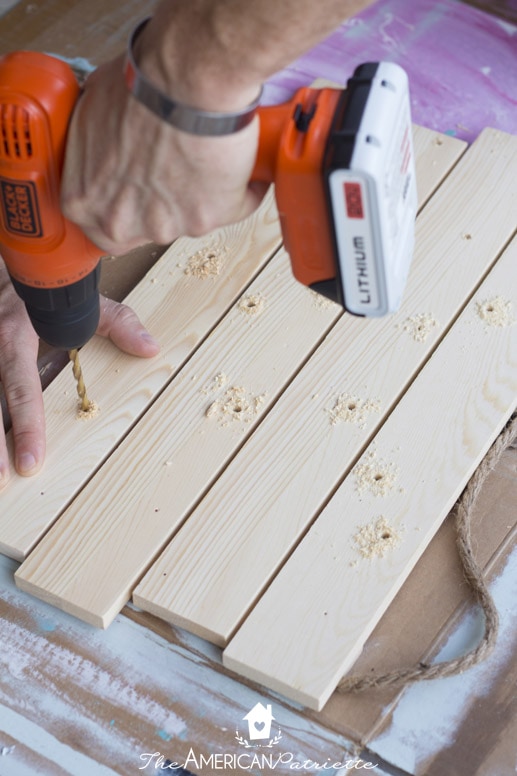
Tip for this step: make sure you drill from the FRONT of the sign, not the back. The holes will be much cleaner when you drill from the front.
Step 5: Stain the sign
This part is SO easy! Once you’ve got your holes in the sign, grab an old sock or rag, squeeze the wood stain onto the wood, and quickly begin wiping the stain into the wood. This shouldn’t take more than a couple of minutes.
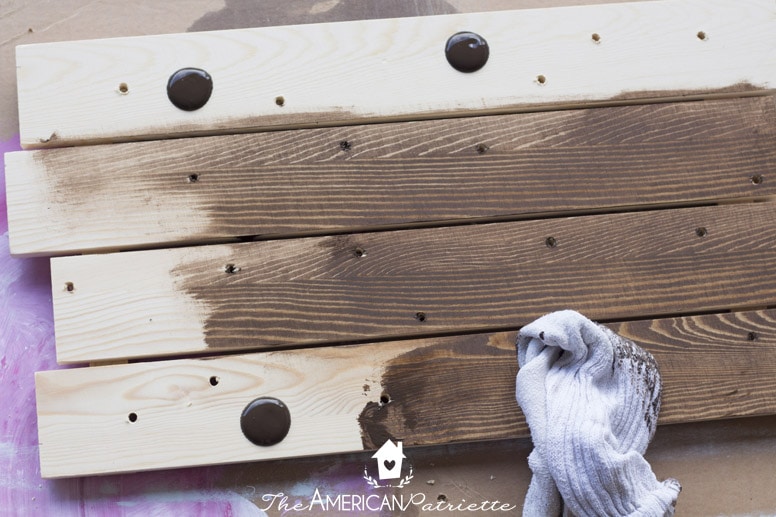
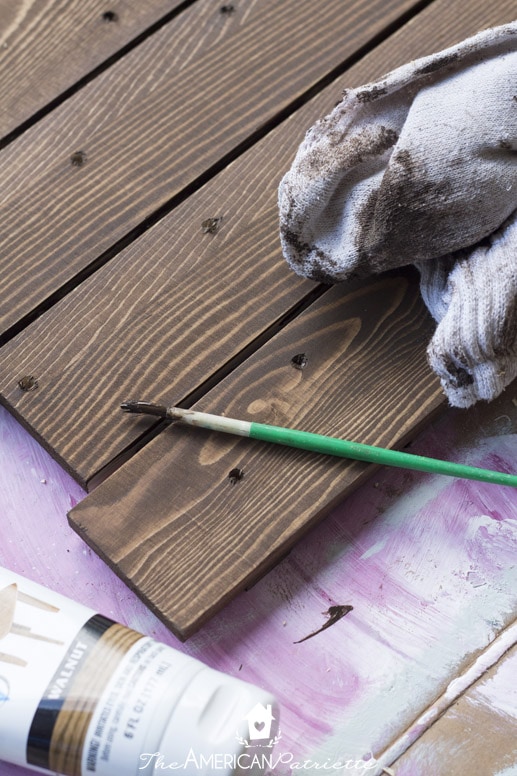
After you’ve wiped all of the stain on the main part of the wood, use a craft paintbrush to get in the crevices.
As you paint in the crevices, quickly follow up with the old sock to prevent any stain from pooling and causing an uneven finish. Allow the stain to dry for about 20 minutes before moving onto the next step.
Tips for this step:
- Use this water-based stain for best results. The water-based stain dries much more quickly, and it also helps absorb the chalk paint for the lettering. The chalk paint will smear more easily with an oil-based stain. It’s also VERY low odor compared to any other oil-based stain, so you could very easily do this project inside without stinking up the house.
- Wipe quickly – this stain dries quickly (which is awesome, because then you can move onto the next step quickly!), so in order to get that even finish, you’ll want to wipe the stain onto the wood as soon as you squirt the stain onto the sign.
- Rub the stain into the wood by applying quite a bit of pressure with the old rag or sock you’re using. This will, again, help give it that even finish.
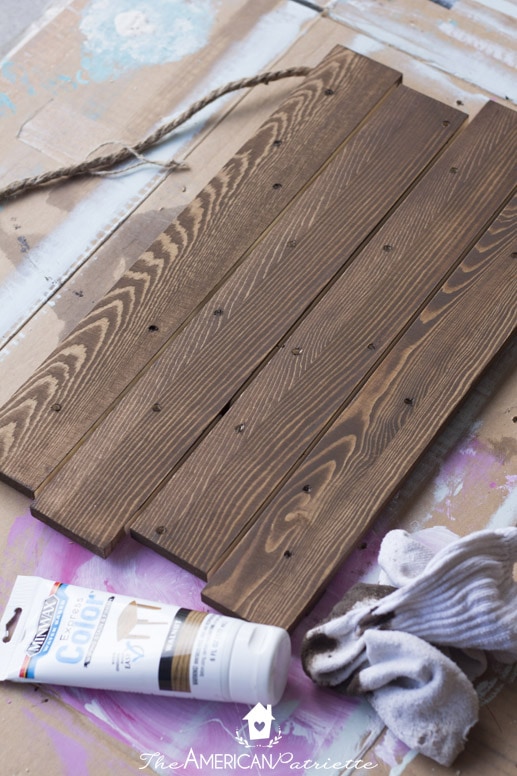
Step 6: Dry brush the sign to give it the antiqued/rustic look
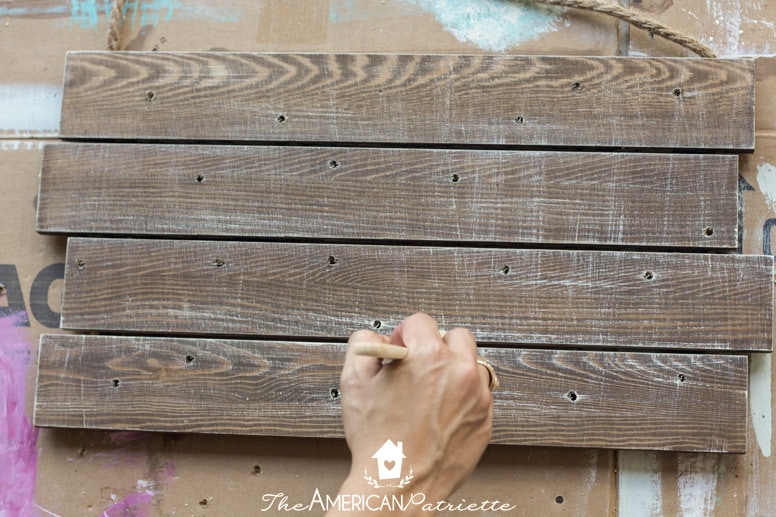
Once the stain is dry (again, give it about 20-30 minutes or until you run your finger across the stain and nothing shows up on your finger).
Grab an old paintbrush and dip it into a VERY small amount of white or cream-colored acrylic paint. LESS IS MORE. Run the paint brush up and down the sign, on the edges, in the crevices, etc. You can always follow up with more paint later.

Tips for this step:
- Less is more. Seriously! Dab the brush into some acrylic paint, brush the paint onto some cardboard or paper to get a lot of the paint off the brush, and then gently begin brushing onto the sign. You can follow up with more paint later.
- Use a little bit of gold acrylic paint (same way you do the white) if you want a little bit of a shimmer to the sign.
Step 7: Chalk the sign

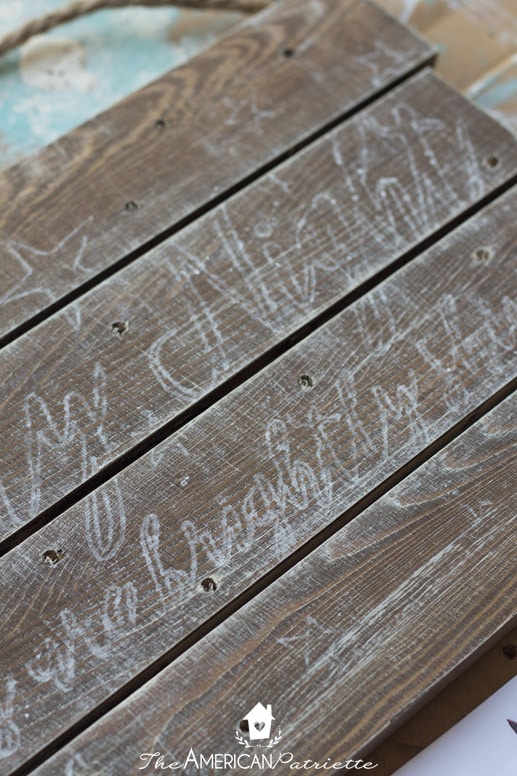
Using a regular piece of white chalk, turn the sign over on the back and color the entire back of the sign with the chalk. Make sure you get chalk over all of the lettering and the stars.

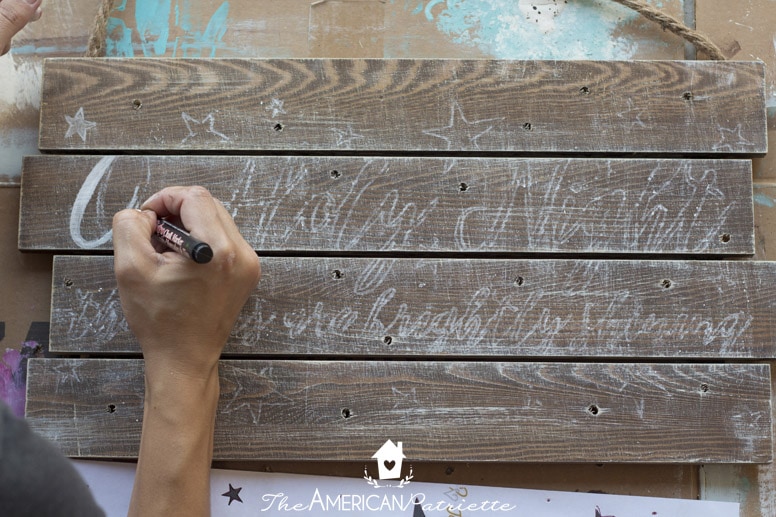
Step 8: Trace the lettering onto the sign
Place your sign back onto your wood where you marked it at the beginning. If I had painter’s tape when I was working on this, I would’ve taped down the edges onto the sign. But, since I forgot to get some before I started working on this, I just made sure to hold the sign tightly in place the entire time I did this step.
Use a pen or pencil and begin to press down and color in the letters. You want to press down hard enough that you’ll get an impression of chalk on the wood.
You’ll notice I only outlined the stars and the letters – no need to color them in completely. You just need the outlines transferred onto the wood so that you have a guide for coloring them in.
You can see how the chalk nicely traced onto the sign so that you can have an easy guide for coloring in the stars and letters.
Tips for this step:
- Make sure you’re pressing hard enough to get that chalk impression into the wood.
- Use a pencil or duller-tip pen for this, just so you don’t poke through the paper too much and get ink on the sign.
- You’ll see excess chalk on the wooden sign after this process. Don’t wipe it off yet! We’ll get there after we paint the lettering and stars on the sign.
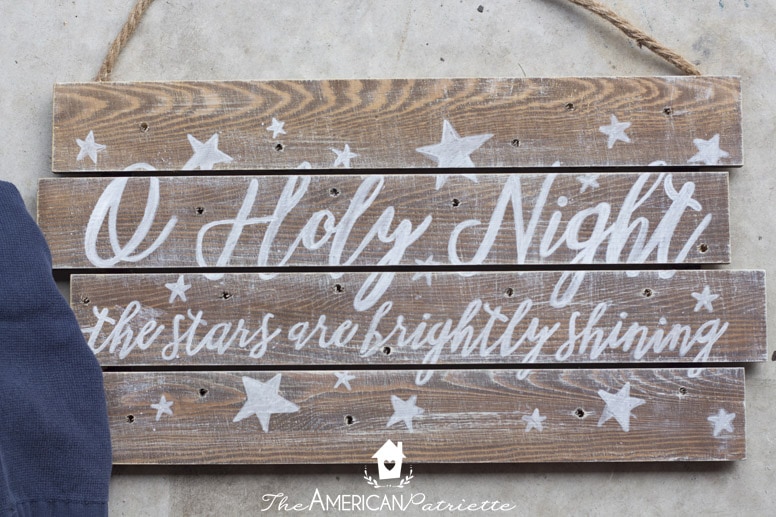
Step 9: Color in the letters and stars with the chalk marker
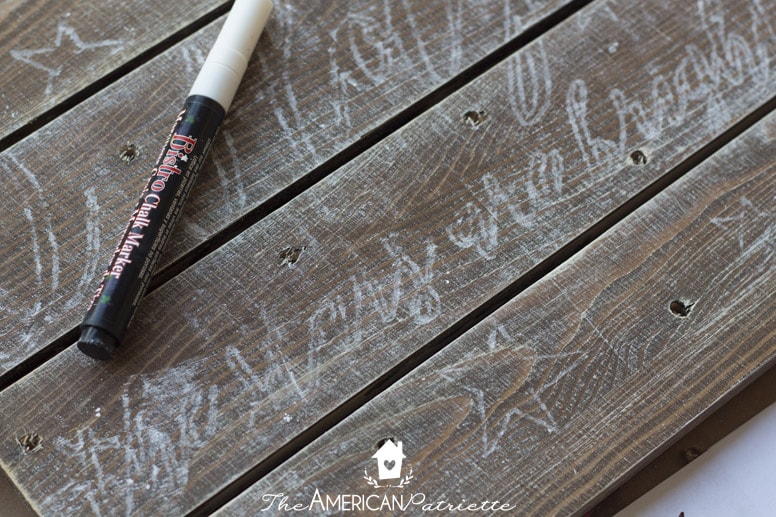
While you can use any kind of white paint you’d like to do this step, I’ve done so many crafts like this, and I’ve consistently found this particular brand of white marker to be the absolute best. I’ve had issues with other white paint markers streaking and not having an even flow. This particular marker has just been so easy to use and produces a beautifully even look. I don’t purposefully use a chalk marker for this (as in, I don’t care that it’s a chalk marker v. a paint marker), BUT, because this has been the best white paint marker for projects, I continue to use it.
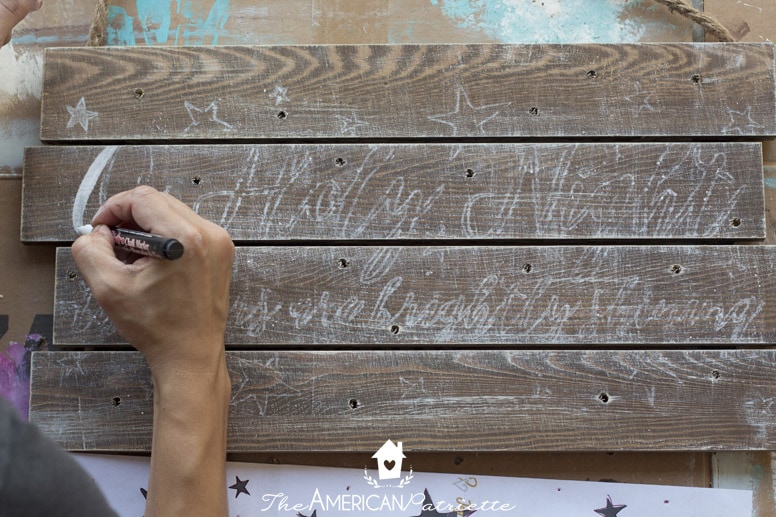
You’ll use your chalk marker to paint in all of the stars and the letters. If needed, use your paper to help you as a guide if some of the lettering didn’t perfectly transfer onto the sign.
Tip for this step: go back over any spots that you want to make darker with the white.
Step 8: Wipe off excess chalk
Using an old towel, gently wipe off excess chalk dust (not from the marker, but from when you chalked the back of the paper and traced the lettering from the paper onto the wood).

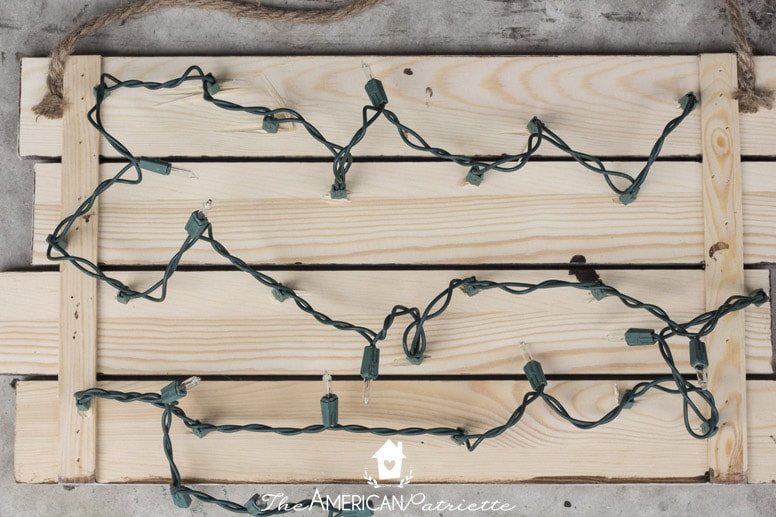
Step 9: Insert Christmas lights
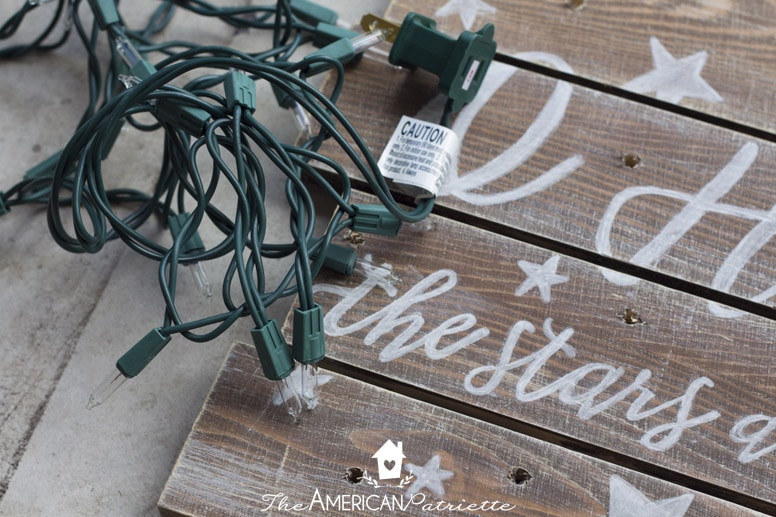
Turn your sign over on the back and begin inserting the Christmas light bulbs into the holes. You’ll continue this until you’ve inserted all of the lights.
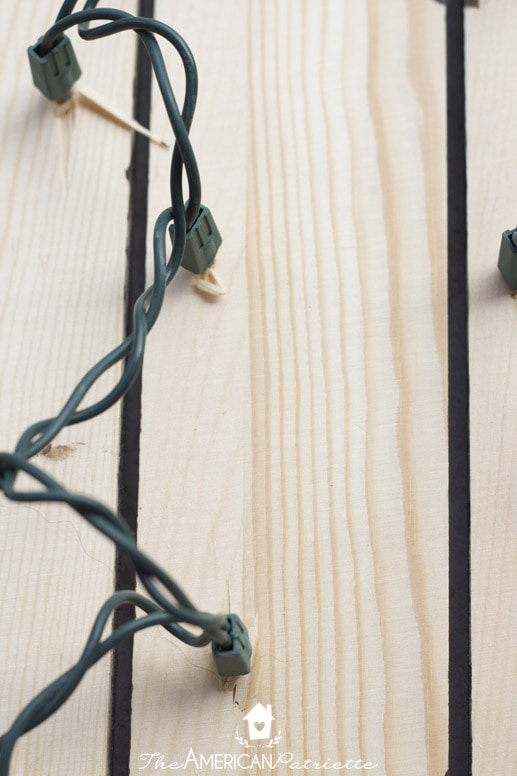
Because these lights fit snugly in the holes, I didn’t need to do anything to secure the light strand on the back of the sign.

You can see the light bulbs just barely poke through on the front of the sign. This helps give the sign that glow you’re looking for, but the lights won’t overwhelm the lettering.


This is what my strand of lights looked like once I inserted them all on the back of the sign:
Now you’re ready to turn your sign over, plug in the lights, and enjoy your gorgeous creation!


Merry Christmas & happy crafting! Hope this piece blesses your home and reminds you of the beauty of this Christ-filled season!
(And, if you’re looking for another fun rustic DIY Christmas project, you haaaaave to check out this DIY Rustic Farmhouse-Style Christmas Cookie Platter. It is SO EASY, and it goes well with the same kind of decor as this O Holy Night Sign!)
If you do want to download the free printable to make this sign with the exact same lettering, you can snag it for free by filling in the form below:
Love this project and want to save it for later? Be sure to save it to your favorite Christmas Pinterest board!
Excited to get the download. I always make something special for my special friends and this is perfect. We have a lot of wood pickets from old fence and I will use those but I did also find some at Michael’s, if anyone is interested. I will check out the paint pen and I’m anxious to get started when I receive my download. Thank you so much for making something special for me to make special for my friends. Happy holidays
Enjoy making this! It’s going to turn out so beautifully!!
Looks like so much fun!
I’ve filled out the form a few times to receive the ‘Free O Holy Night printable download’ template, but haven’t received it. Can you please email it to me directly? Sounds like a similar issue with others requesting the download. Thank you!
Hi Mickie, So sorry I’m just now getting to your comment – I took a break from all the craziness of blogging so I could spend more time with my family over the holidays. It’s SO frustrating that template isn’t making it to some people’s inboxes – it’s just others’ inboxes that have spam filters on them that mark my emails as spam (which they’re obviously not!) and then they never make it to you. Did you ever end up getting it, even in your junk folder?
What kind of chalk did you use,my chalk is not transferring
Hi – I know you mention here that there is a link to the sign you used from Hobby Lobby – but I dont see that. Can you please add the link here. Thank you – great looking sign!
Unfortunately, Hobby Lobby changes their inventory enough that it makes it difficult for me to link to anything. The first time I made this sign and it went viral on Pinterest, I actually ended up having to change the entire tutorial because Hobby Lobby no longer carried the original pre-lit sign I used to make it. So, I’ve learned that since they change their inventory, I need to create a tutorial around a pallet sign that’s relatively generic that Hobby Lobby will *hopefully* to continue carrying some variation of. I also intentionally chose a pallet sign that was really easy to make from scratch if Hobby Lobby discontinued carrying all of their pallet signs!
I love this sign! Had to improvise because I couldn’t get the correct board sign and it turned out perfect! Made it for a friend for Christmas last year! I want to make myself one and I lost the pattern but I can’t get the email to print the template again!
You should be able to access it any time in the resource library! You’ve got the password & link to it in the emails you would’ve gotten from me! 🙂
I haven’t recieved the printable for your sign. Will you please send it to me? Thanks for sharing!
Emailed it to you a few minutes ago! 🙂
I have not received the email with the template for the sign. Can you please email it to me directly? I have entered my information twice and have checked my junk mail box with no luck.
Check your email! Just sent you one! 🙂
I love this project and I ran to Hobby Lobby to grab the wood(and the lights) and now, I’m ready to start. With one small problem. . . I can’t get access to your printable. Can you help?
Hi Michele – did you fill out the form to get it via email? If so and you haven’t gotten it yet, give it just a bit (also check your junk folder) – sometimes my email service provider is on a delay. I’m really working on fixing it – it’s been an issue recently!!
I am very disappointed. I have left my email address twice, but I have not received the download.
Hi Kathy, I’m working on some issues with my email provider. I’ve been having a lot of issues this week with deliverability – I’m not sure what’s going on. I’ve been doing some testing, and even my own emails are ending up in my own junk folder. I’m happy to email it to you directly – I’ll do it in just a few. 🙂
Check your email – I just sent you an email. If you don’t see it, check your junk folder. 🙂
Excited to try this project
It’s a fun one! 🙂
Could you email the “O Holy Night” pattern to me directly? I have tried to get it from here, but nothing shows up in my mailbox. not even the spam box. Thank you. It’s a great gift idea for crafty people!
Hi Sandy – that’s such a bummer! I need to check on that. Where did you sign up? I’ll check my email service provider and see what’s going on. In the meantime, yes, I can email it to you.
Love this! Printed template. Now wondering what size boards did you use. I’m guessing 1×2?
I mentioned in the tutorial that I bought the sign I used at Hobby Lobby, but you could certainly make it with 1x2s if you wanted to make it yourself. I would just use the printed template as the unit of measurement for how long you’d need your boards to make it if you don’t plan to use a pre-made sign from HL! 🙂
Hi! Do you know where I could find plans to make this in a very large size? (Meaning maybe 3ft high by 5 ft wide).
Hi Karen, I’m not sure. I would recommend just doing some searching for “large pallet signs” and you might turn up some good results like that! You wouldn’t be able to use the same template I’ve created though since the template is created to fit the same size sign I made. You’d just need to look at it for inspiration and see if you can copy it by looking at it!
I am so looking forward to making this beautiful Christmas sign.
Your directions are the best
I will be following more on all of your topics
I also use Amazon and appreciate your info
Thank You ?
Hi Meredith, thank you! I really try to be as thorough as possible – I like knowing exactly what to do when I’m working on a project! 🙂
I sent for the sign template/stencil but it never recieved an email…. not sure if i did something wrong so I tried it a second time and still no stencil.
Hi Peggie, did you check your spam folder? Sometimes email providers will send my emails to spam because they don’t recognize my address. If you check and it’s still not there, you’re welcome to email me mauri (at) theamericanpatriette.com and I’ll be glad to send it to you.
This is such a tutorial and a beautiful craft to make. Thank you, i am going to make two of theses for my sisters. You are so amazing thank You
Yes, I hope you have fun making it!
Can you seal it with something so the chalk from the chalk marker doesn’t eventually rub off?
Yes, you probably could! But, I made my original piece 2 years ago, and there are zero signs of any kind of wear on the piece. I’m sure there’s some kind of sealant you can use (I should look into that…I’ll put it on my to-do list and re-update the post if I find something to use that wouldn’t mess up the quality of the piece!), but mine hasn’t suffered any kind of degradation in the last 2 years. I don’t store it any differently than I do any of my other Christmas decorations…it just sits in my hot Texas attic 11 months out of the year!
I’ll be looking for supplies in the Uk to make this it’s gorgeous. Thank you so much for posting. I can’t wait to start!
I’ll be doing an updated tutorial sometime in the next couple of weeks, so hopefully with the update, it’ll be easy for you to create one yourself since you won’t need this specific sign! 🙂
Beautiful! What are the dimensions of the sign?
Thank you! It’s 22.5″ wide. I link to the sign in the post if you want to go look at the exact product I use. 🙂
This is the nicest DYI project I have come across!! You described everything so well, and gave just the perfect amount of pictures and directions! Thank you so much for sharing this classy project with everyone! ~heartfelt <> from MN
Thanks so much, Deann! I try to be as thorough as possible so people know exactly how to make what I share! 🙂
I was searching for the sign on Hobby Lobby. I couldn’t find it. What should I search?
You shouldn’t have to search at all – I link directly to it in the post! 🙂 Did you try clicking my link?
Hello! I love love love this, and actually wanted to buy this sign at Hobby Lobby but had no idea what to paint on it. Now I do!
My only question is, how did you do the dry brush technique?? It looks super nice, but I’m scared I’ll ruin it, so I’d like to know exactly the steps you took!
Thanks so much in advance!
Hi Julia! So glad you asked this!! My cousin came this past weekend and we made THREE of these signs together, and we took some videos of me making one. She and my husband took some short video clips of me doing each step, so now I have to put on my research cap to figure out how to piece all of the videos together to make one continuous video. I really want to try to do that by early next week, and then I’ll post it on my Facebook page. If it’s easy enough to figure out how to piece the videos together and post them, I really am going to do that ASAP! 🙂
We don’t have hobby lobby here in Canada. How would I make my own wood board with lights from maybe pallets? ANyone done this before?
I know they sell the signs online. Does Hobby Lobby deliver in Candada? If so, you could try that! (And be sure to use the online 40% off coupon!)
I love this project! I signed up today and received the email right away and clicked the link. When I click the link to go to the resource library for the lettering it sends me back to the sign up.
Hi Jen, sorry about that! Did you click the link from the email? It should take you to here: http://www.theamericanpatriette.com/resource-library/
I’m in a loop…subscribe, receive email, confirm, search for sign, click on printable, asked to subscribe, etc. What am I doing wrong?
Oh no! Have you been to my resource library yet? In the first email you received, you should’ve gotten a password to my resource library. Once you have that, go here and enter the password: http://www.theamericanpatriette.com/resource-library/
I’m noticing you asked this question a few days ago. I’m so sorry I’m answering so late – it’s been a very challenging week within our own family and with some dear friends of ours, and I haven’t been able to do much work on my blog. I’m trying to do a little catch-up today! Please forgive me!
I can’t enter the resource library without a password, but I wasn’t asked to set one up and didn’t get one in the email confirmation. Can you tell how I can get or set up a password?
Judy
Hi Judy, I’m sorry you haven’t gotten it yet! Have you checked your spam/junk mail? I’m finding that my emails are often ending up in people’s junk/spam folders! If you check and you still don’t have one, please let me know!
I am having the same issue. No password being sent, just a loop to subscribe and check emails while not being able to access the printable?
So frustrating! I need to go figure out what’s going on! I’m putting that on my to-do list for today. I’m not sure why this has been such a hassle for y’all! In the meantime, email me at mauri (at) theamericanpatriette.com and I’ll get you taken care of. 🙂
DO THESE LIGHT_UP BOARDS FROM HOBBY LOBBY COME WITH THE HOLES AND LIGHTS ALREADY IN THE BOARD?
Hi Judith! Yes, the lights are already in there! If you look at the photos in the post, you’ll notice I took a picture of the back side of the sign and there’s a battery pack there. All you have to do is provide the batteries and paint this – no construction or assembly of anything required! 🙂
I did not receive your email on printed sign
Hi Gail,
I’m so sorry you didn’t get this! Did you check your spam folder? If not, shoot me an email (mauri(at)theamericanpatriette.com) and I’ll send it to you. 🙂
Hi Mauri,
I signed up for your resource library and have received my password from you. However, I am not able to access the beautiful font for the Christmas sign. When I click on the link the page says “page not found”. I would appreciate your help.
Thank you,
Jo
Hi Jo! I just sent you a response to your email! Thank you for taking the time to email me and let me know about the issue! I had no idea the link was broken. I explained in my email that I had been doing some updates to my site over the last couple of weeks, so the link must have broken in one of those updates. I’m so glad you let me know! Try accessing it again and you shouldn’t have a problem, but please let me know if you’re still having issues!
I happened upon this project, and quickly saved it a couple of weeks ago. Just so happened that the wood panel was on sale today, so I quickly grabbed it. I can’t wait to make this project for our Christmas holidays!
I’m curious, what font did you use?
Hi Anne, I can’t believe the wooden panel was on sale at Hobby Lobby! I didn’t think any of their unfinished wood in the craft section ever went on sale! That’s so exciting – I’ll have to keep my eyes peeled for those sales. I used Mallicot Script for the font. I didn’t think about this, but I think I might be able to upload the document I created with the text on it to my Resource Library and then make it available for an easy download. If I remember, I’ll try to do that tomorrow and I’ll comment back and let you know it’s available, and then you don’t have to go create the text document yourself. This has been a super popular project for others, too (I’m so glad people like it! It really does make for beautiful Christmas decor!), so I’m sure that would be helpful for y’all wanting to do this project!
Hi Anne!
I put the printable to make the sign in my Resource Library. You can go get it here! Take a picture and tag me on Instagram @theamericanpatriette when you make it so I can see it! 🙂
Thanks so much for sharing that!!!
You’re welcome! Let me know if you have any issues downloading it!